When asked what are the Steps To Creating a Sailing Blog, you’d think there’d be a quick and straightforward answer but as with many things, the answer is ‘it depends on why you want a sailing blog and what you want to achieve by having one.’
In my five years of blogging about sailing the seas I’ve come across several other bloggers and vloggers (video blogs) and the three main reasons that people start blogs are as follows:
- Update Family & Friends. To update family and friends as to where they are, what they’re doing and what their life is like. It’s so that they can permit those that cheered them on to share the journey. Additionally, it allows them to prove to naysayers (those that thought they were crazy for wanting to sail away) that the choice they made was a good one. In addition to updating family – it’s something they can look back on in later years to serve as a record (especially for children).
- Make Money. To generate an income to fund or provide extra income while they’re sailing.
- Creative Outflow. To have a creative outlet. Many new cruisers come from a highly engaged business or professional background. Going from being a company owner or a Doctor to a sailor is a drastic change. The emphasis from brain to labor work shifts and the creative outlet can often get lost in the mire of servicing and maintaining a boat. Some people create a sailing blog to exercise their creative juices and learn a new skill.
Your decision to create a sailing blog might be one or all three of these reasons.
It could also be that you want to eventually make money from a blog, but you have no idea how that might work. You’d rather start off with something simple for family and friends and see how that goes. There are no rules.
The reason I’ve started off with the WHY is due to the fact that, like anything in life, if you don’t know why your doing something and what you’re trying to achieve you’ll never get there.
This article will cover the HOW for those that want to start simple and set something up for friends and family to see.
If you’re interested in the making money part of a sailing/cruiser blog, subscribe to my newsletter and other freebies and you’ll get notifications of new articles as and when I publish them.
Before we get started and just for clarification purposes, I want to define ‘blog.’ A blog is a website. The two words, ‘blog’ and ‘website’, are synonymous. Yes, some companies have products and services pages in addition to areas called the ‘blog’. In that case, the blog area is usually educational articles, press releases, news and anything other than sales pages.
You can have a blog that simply has pictures and a diary of where your travels have taken you. You can also sell t-shirts on your blog, feature videos, have a forum, create a private ‘members only area’. Again, there are no rules.
So a blog is a website but it can also be an area within a website. Generally, it’s the area that gets updated with new articles or posts.
Creating a sailing blog for friends and family
There’s loads of ways to create a blog but I’m going to give you one of the easiest step-by-step ways so that you can get your blog up and running today. When you take a deep breath and say to yourself, ‘I can do this…’ you’ll be astounded at the result you can achieve within an hour or two.
Let’s get this party started…
Visit WordPress.com and sign up. It’s free. Over 30% of all the websites on the Internet are created in WordPress. It’s the least risky thing you can do. It’s fast. You don’t have to worry about domain names, hosting or configuring stuff.
If you decide that blogging isn’t for you you’ve lost nothing. And if you want to get more involved (e.g. get a domain name like www.NameOfYourBoat.com or move the information you create – pictures and text – you can always do so in the future).
WordPress is an open source platform meaning that it’s free. It’s open for anyone in the world to create websites and/or develop programs that enhance websites (for free or for a charge).
Programs that enhance WordPress are themes (overall look and feel of the website) and plugins.
A theme is a structure that you can choose that will hold your pictures and text. Themes come with color options, menu’s (placement and functionality) and page layouts. No one designs a website from scratch anymore.
All you need to do is find the theme you like and then fill it with your photos and text.
When you first get into WordPress there’s a default theme.
It’s boring. You have the option of using the boring theme or picking from others. Some themes are free and others you pay a nominal fee for.
A plugin is something you virtually pull off the shelf, plug it into your website and have new functionality. Plugins include: ecommerce shop, fancy photo gallery, facebook/instagram/pinterest feed, sign up form for people that want email notifications about new posts and so forth.
Before, however, you set up your WordPress blog, choose a theme and find plugins it’s best to outline the categories or menu structure that you’d like to have for your blog.
To create your menu there’s two main components: Blog Articles & Pages.
(Stick with me here…you’re almost done with the explanation part. Soon, I’ll provide you with a checklist to get you up and running quickly).
Let’s first talk about pages, as they’re easy to nail down. A page is static. You write it once and it’s on your website for all to see. It’s not an area with updated entries. So, pages include: The Crew, The Boat, Our Story and Contact Us.
The blog articles, however, are under a menu heading that gets updated. When you go into ‘Blog’ or whatever you want to call the heading, the latest article you wrote is at the top. Under this menu heading you update it once a week or month and can be written by you, your partner, your kids. You can set your blog to be on the home page of the website or in a separate area under a menu heading.
At it’s simplest, there’s no classification of blog articles.
You simply write something every week and it shows up on the home page, under ‘Blog’ or ‘Our Journey’ or whatever you want to call it. If you want to get more advanced, you can separate it into different categories and have blogs or articles about your sailing destinations, galley recipes (you want to share) and your servicing and maintenance log.
If you don’t know how you want to break down your blog articles, don’t break them into categories. Write something every week and if you eventually discover that you have two themes you’re writing about you can always ‘tag’ the articles and easily separate them into two menu headings.
The key thing to grasp about WordPress is that all your pictures and your text are held in a database.
Once you put the content in WordPress, it’s there to stay. If you want to change the display side of things everything can be changed. You can always change your theme (website structure, colors, menu, page style, etc.), move your website (and database) and/or restructure your categories. It’s a brilliant system.
The best advice I can give, at the beginning, is to start simple.
If you overthink things they appear to get complicated. Before you even start it’s easy to shut off, thinking it’s too overwhelming. Keep telling yourself that it doesn’t matter if you mess up – you can change things later.
7 Steps To Creating a Sailing Blog (For Family & Friends) Checklist
1. Decide the pages you want to have (About us, Contact Us, The Boat, The Crew)
2. Have an idea in mind what you want to write about (Blog). Many people write a routine update as to where they sailed to and what they did while they were there. Some families have their children write articles too. You can have one blog section with different authors.
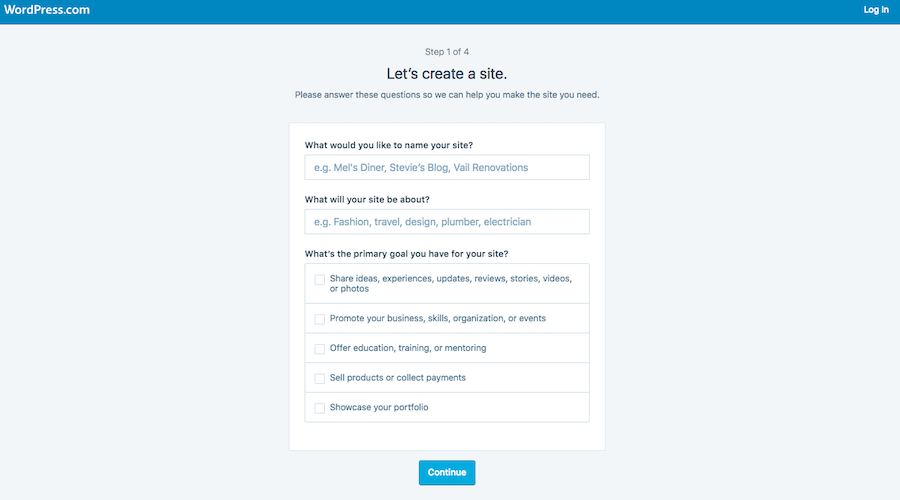
3. Sign up for a free website at WordPress.com and click on the ‘Get Started’ button. Fill out the four screens to get started. Don’t opt in to pay for anything. Just go the free route for now. You can change things later.

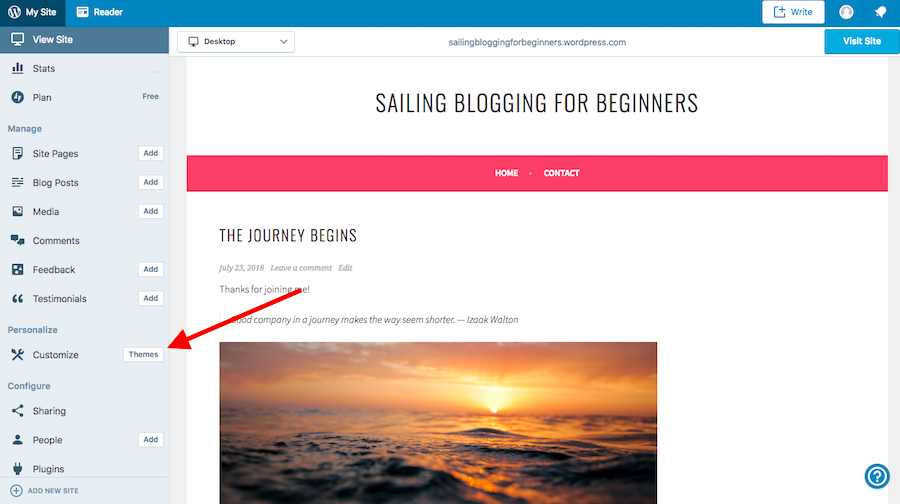
4. Once you’re into the system, you’ll have the ‘control panel’ on the left and the website, or blog, on the right. Start first with the theme. Look at the Customize themes option (along the left side of the screen as shown below – the red arrow is pointing at it) and pick a free one that looks best to you. Any theme without a price is free and you can refine your search by clicking on ‘free’. (Again, don’t worry if it’s not perfect – you can always change the theme). Each theme will have online help regarding options and ‘how-to’s’. The best thing to do, however, is to just have a play with it – change all sorts of configurations and see what happens on the screen. Add a header image and find out what it looks like. Don’t worry about messing things up…you’re just playing around for now. Go click crazy – who cares if you break it. You didn’t pay anything for it!
5. Activate the theme and publish it (don’t worry – no one can find the site yet so no one will stumble upon it). ‘Activate’ and ‘Publish’ can be scary words but ignore them. It’s not until you tell people about the site that they’ll be able to find it.
6. Go to ‘Blog Posts,’ (along the left side of the screen) and click ‘The Journey Begins’. That’s a holding page that you can change. Change the headline, change the text and change the photo. It’s just like using MS Word. Swap out the picture that’s there for one that you have. Write some text. Publish it and see what it looks like. Play around like a kid. You have permission to click on everything and give it a go.

7. For Pages (along the left side of the screen), update the ‘Contact’ page that’s already there and then add a page like ‘The Crew’ or ‘Our Story.’
~
Play around for a bit. Add content – pictures and text. Click on things to find out what they do. You can’t break things (too easily). So get familiar with the layout of WordPress. If you don’t like the theme, go back and change it. See what happens when you change it.
If you have something written already or loads of images, you can get something published in a few minutes. Don’t worry if it doesn’t look good at first – no one can find your website unless you give them your web address!
Play around.
Yes…play around. It’s a foreign concept to us now days – to play. We set out to do new things perfectly and knowing we’re destine for failure, we actually never start. Don’t let this happen to you.
As time goes on you’ll get more and more familiar with the control pannel and you’ll make small improvements. For today, just get something up and running.
Once you have something set up, make a commitment to post a new article every week, bimonthly or monthly.
Or – if you have the time, write a couple posts every week. What ever you choose, make it a habit. It’s the only way that you’ll carry on.
When you’re ready for friends and family to see your creation, send them the link to your website via email, on Facebook and any other social media that you’re on. Invite your readers to comment on your posts.
Creating an all-singing and all-dancing sailing blog doesn’t happen from day one. All successes come from starting small and making incremental small changes as we learn and grow.
My first blog was a mess. Over time I got better at writing and deciding on photos. I’d try out a new plugin and see what it would do. And the learning curve continued. People so often get bogged down with the enormity of creating a perfect blog and never get started.
Remember – there are no rules. No one can see the blog until you send them the link.
If you don’t set it up and make a commitment to do a bit each week/bi-monthly you’re going to end up at the end of your sailing adventure with a bunch of photos on your computer and no blog-styled record to show the journey! And that would be a shame.
Amen.
Let me know if you have any questions by leaving them in the comments section below.
And remember to request my weekly newsletter and other freebies: Sign up here

very informative . many thanx
Thanks for your inspiration! Ingrid