If you told me a couple years ago I’d be writing an article on how to reseat a sailboat mast, or how to use Spartite, I would have said, ‘What’s reseating,’ ‘What’s Spartite,’ and ‘who’s mast are you talking about?!’
But let me back up. A couple weeks ago we left the Greek Ionian Islands and sailed into a Force 7 (rough sea and wind) with Sicily as our destination. The plan was to get to Sicily, grab our new bimini (the canvas that covers the cockpit and keeps the sun off of us) and solar panels – of which we had delivered to a friend’s house. From Sicily, we’d then carry on up through the Massena Straight and over to Naples to see Pompeii and then head West (we’re crossing the Atlantic in November!)
But getting to Naples hasn’t happened – it’s two weeks later and we’re still in Sicily
Heck – there are worse places to be stuck. So what happened? On the crossing about a quarter way to Sicily our mast started to creeeeeeeeeeeeeeeeeaaak. My husband, Simon, and I became ill with worry wondering what the problem was.
We furled the gib (front sail) to take pressure off the mast and when the creaking didn’t stop, we eventually dropped the main sail and motored.
Not being able to phone anyone – we were in the middle of the Ionian Sea – both Simon and I put on brave faces and carried on until we hit Taormina, Sicily.
Neither of us slept for 2 nights and the stress could be seen in our faces
To my absolute relief, a friend moored in Taormina, offered to take our five-year-old daughter, Sienna, out for the day.
Simon and I slept for a few hours and then started to investigate the issue.
The best explanation that we could come up with was that the compound around our mast melted in the high heat. For over two weeks the temperatures were around 38 C or 100 F.
When we left Greece it was around 6pm and the mast was in the sun all day
We then went into very turbulent waters and it’s believed that our mast pushed the melted compound around so to create a space between the mast and the compound. Once the space was created, there was a terrible creaking sound as the mast rubbed against the compound.
Poor Simon and I thought the whole rig was going to come down the noise was so loud
After making loads of phone calls, Andy from Stella Maris Yachting Services (based in Southampton, England) recommended the product Spartite. Apparently, Spartite is the best product available on the market to reseat a mast.
We ordered the product from the UK to be sent down to Sicily and then attempted to find a rigger in Sicily to help us. Unfortunately, the whole island of Sicily goes on holiday for the month of August so we couldn’t find any help.
Worried that we’d be messing with something as major as our mast, we considered flying someone down from the UK to help us.
As you can imagine the cost of fixing our mast was quickly escalating
In the end, hubby and I grew some balls and decided to tackle the project ourselves. In a way, reseating our mast has become a milestone for us – it’s the first large project we did completely by ourselves and we did it as a team. (Read There’s no I in Team but there’s a Me).
When you order Spartite, you get a full set of products to do the job – even the gloves, stir stick and petroleum jelly come with the mast reseating compound.
Whoa – have I explained what reseating a mast is yet? I don’t think so…
Every ten to fifteen years the mast of a boat needs to come out, and the standing rigging has to be changed. The standing rigging consists of the metal ropes you see that hold the mast in place. Some of the metal ropes go straight to the mast and others go along the spreaders , or arms that come off of the mast. There’s also a metal rope from the back of the boat to the mast (backstay) and another metal rope from the front of the boat to the mast (forestay).
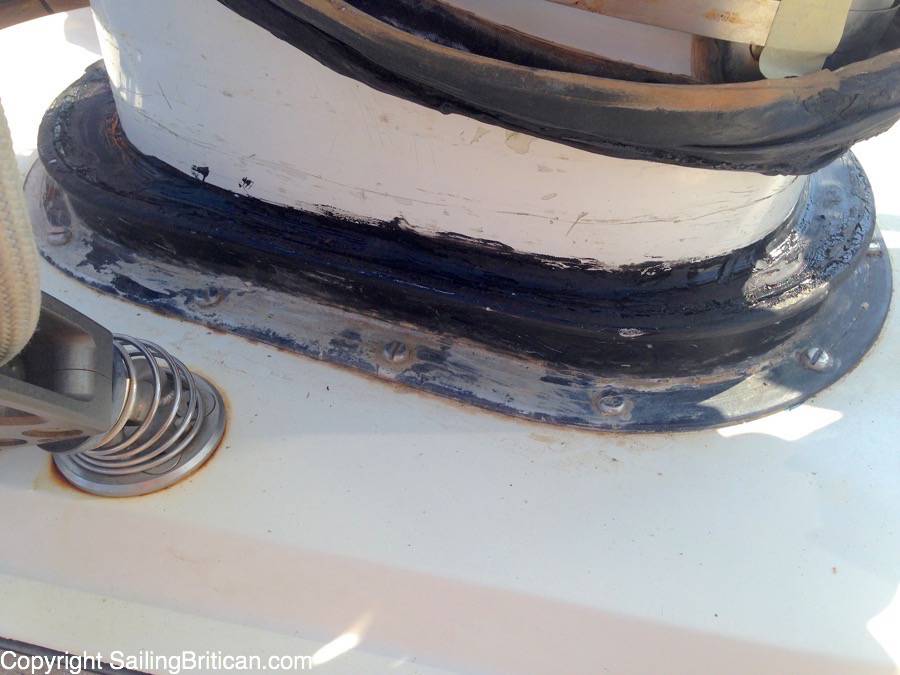
When you take the mast off a boat (usually with a crane), you have to clear out the area in-between the mast and the hole in the deck that the mast fits into. Around the mast there’s a 3mm to 10mm space that is open to the elements. To ensure water doesn’t leak into the boat, this space needs to be sealed.
There are various ways to seal the space – some boats use wooden wedges, a plastic covering and amalgamated tape. Other boats have a rubber compound followed by a plastic covering and tape.
When we realized that our mast had to be reseated, we sourced the best product we could find – Spartite
So…although it’s a big project to mess with your mast, the actual reseating job wasn’t difficult. It took all day but that’s because we took our time, read the instructions on how to use Spartite over and over again AND we watched a video on YouTube to ensure we really understood the process.
Step 1: Make sure the boat is not moving or is as flat as possible
The job needs to be done while in a marina or on the hard. We moved our boat from a bay in Toarmina (known for having swells and hence rocking back and forth) to Riposto Marina at the base of Mount Etna (Read my review of Riposto Marina). Also make sure it’s not going to be too windy or rain…
Step 2: Remove covers, tape and the old mast seating
First, we took our canvas cover off the area where the mast hits the deck (not shown). Then we loosened two clamp thingies, removed the amalgamated tape, and pried a rubber covering up the mast (to move it out of the way).
We then started to work on getting the old compound out. This took us a couple hours to get out and clean. There was some sort of compound around our mast that we pried up using screwdrivers. It took a lot of jimmying and hammering screwdrivers in to get it to lift. Once the rubbery compound started to life, my husband, Simon, cut it and it came up.
Step 3: Clean the mast and rim of the deck
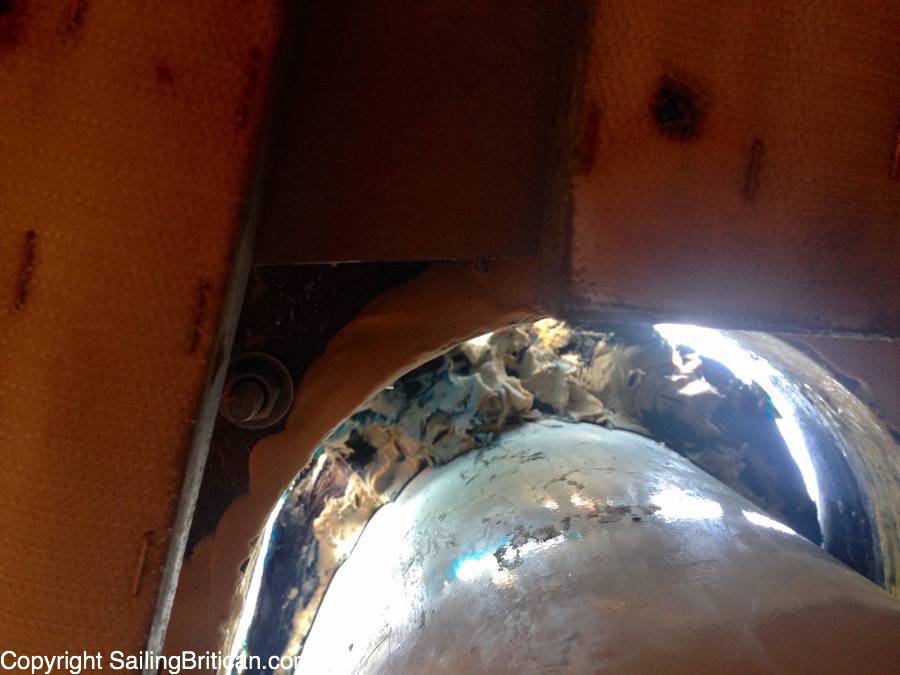
After getting the compound out, we spent a long time cleaning the Sikaflex (sealant) off the mast. It’s important to always work with clean surfaces so we used a knife, screwdriver and acetone to rub the sealant off being careful not to scratch the mast.
Step 4: Build a dam for the compound to be poured into
Considering there’s a massive hole leading from the upper deck down into the saloon of the boat, you have to build something around the mast for the rubbery compound to be poured onto. Using foam inserts and kids modeling clay (provided in the kit), we stuffed the foam into the hole and then slowly and painfully put clay over the foam so to create a smooth holding area for the compound.
Getting the foam to a correct level was tricky – if we pushed it down too far, it would pop down into the boat. If it was too high, we would nor have the ideal level of compound to seat the mast.
What we did was I worked at the top of the hole and Simon stayed below. He created resistance so the foam stayed along the bottom of the dam area rather than falling into the boat.
It took ages to get the foam in and even longer to pack and smear the clay. I’m sure we’d get quicker at doing this job if we did it over and over again but, as I said in the beginning, we took our time so to ensure a successful outcome.
Smearing the clay was easy around half of the mast where I could get my fingers in, but along one side of the mast, the area was too small for even my pinky finger! I used the end of a kids paintbrush to smooth the clay over the foam.
While I was working with the clay at the top, Simon was below, adding more clay reinforcements to any areas that we felt might be weak.
When you pour the compound into the seating area it’s a liquid so the last thing you want is a leak going along the mast.
Step 5: Tape the sides of the seating area so to allow the compound to rise above and cover the lip
Different boats have different set-ups. For us, we needed to fill the cavity around the mast and then allow the compound to rise up and over the ledge on the outer side of the mast hole. By doing so, we’d be covering a potential water intake spot.
You can have water enter either along the mast or along the outter side of the compound, so by pouring over the lip, it’ creates a bond and ceiling ensuring no water can get in.
After a few circles of tape and a reinforcement circle below below the ledge, it was time to mix and pour the Spartite.
Step 6: Mixing and pouring the Spartite
Hubby and I held our breath as we opened the first bottle of compound – make sure to have a knife or a can opener (the kind that you put a hole on one side of the can and another on the other side to allow it to breathe). After you unscrew the top, it’s a metal lid that you have to break through.
So…you pour the contents of can A into a little bucket that’s provided. You then pour the contents of can B into the same bucket and you stir for two minutes. Then, you pour the contents of the bucket into another bucket, scraping the sides, and stir in that bucket for one minute (I used my iphone to time everything!).
The compound will set in seven minutes (less if it’s very hot out) so you need to work fast.
Once the compound was stirred, I squeezed the bucket to make a bit of a spout and poured it into the area above the dam. I didn’t move the bucket…I poured slowly and allowed the compound to even out around the mast.
We had to use two small kits to fill up our seating area, so we poured 1 ½ buckets into the mast.
Step 7: Sit back and let the Spartite magic happen
Within a few minutes the compound was rock hard. It was amazing – before we got up to clean up, we couldn’t pull the stir stick out of the bucket. Talk about fast acting.
Both Simon and I monitored the mast below deck to ensure there were no leaks. We also inspected the upper rim to ensure that we covered it enough to create a seal. Everything looked good accept for a massive black cloud that was forming at the foot of Mount Etna.
Previous to doing the job we checked the forecast and it said no rain. Wouldn’t you know, Sicily got hit with one of it’s worst storms ever…and it just so happen to hit within an hour after Simon and I reseated the mast!
I wrapped the foot of the mast up with cling film and we sat below decks watching for water drips. To our amazement, there were no leaks!
Step 8: Use a sealant around the compound and the mast
The day after the storm and everything was dry again, we used Sikaflex to seal around the Spartite and the mast seam. Once that was on, we covered the whole area with amalgamated tape, pulled down our rubber cover, screwed down the clamps and put our mast fabric seat cover back on.
So…that’s it for our Spartite experience. Before we did the job ourselves, we watched the below video on YouTube a couple times (The video is done in three parts. Watch part 1 here: Spartite) AND read the instructions a few times too. So far, so good! There’s no creaking any longer, no leaks and we’ve done 220 miles (in good and bad weather) since the reseating. Both Simon and I were very pleased with the ease of use and final outcome.